Install: Difference between revisions
Jump to navigation
Jump to search
No edit summary |
m (→Install) |
||
| Line 1: | Line 1: | ||
[[ja:インストール]] | [[ja:インストール]] | ||
== Install == | == Install == | ||
* Download zip file and extract it. | * Download the zip file and extract it. | ||
* Run Mulka2xx.msi. | * Run Mulka2xx.msi. | ||
* Select installation folder as you like. | * Select the installation folder as you like. | ||
* | * An alert about user access control will be displayed. Please click 'Yes' to allow. | ||
[[File:install-2.png|upright=1.5|thumb|none|Install dialog]] | [[File:install-2.png|upright=1.5|thumb|none|Install dialog]] | ||
[[File:install-1.png|upright=1.5|thumb|none|Alert (Windows 7). It depends your OS.]] | [[File:install-1.png|upright=1.5|thumb|none|Alert (Windows 7). It depends your OS.]] | ||
Revision as of 13:48, 29 April 2021
Install
- Download the zip file and extract it.
- Run Mulka2xx.msi.
- Select the installation folder as you like.
- An alert about user access control will be displayed. Please click 'Yes' to allow.
Uninstall
- You can uninstall programs from control panel.
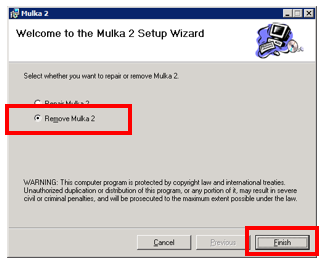
- Also it is possible to uninstall by running Mulka2xx.msi again.
- Select 'Remove Mulka 2' and click 'Finish' button.
Version up
- Download zip file of new version and extract it.
- Run Mulka2xx.msi.
- Uninstall dialog appears. Uninstall old version first.
- Run Mulka2xx.msi again.


